Developer Guide
- Acknowledgements
- Setting up, getting started
- Design
- Implementation
- Documentation, logging, testing, configuration, dev-ops
- Appendix A: Product scope
- Appendix B: User stories
- Appendix C: Use cases
- Appendix D: Non-Functional Requirements
- Appendix E: Glossary
-
Appendix F: Instructions for manual testing
- Launch and shutdown
- Starting up with missing/corrupted data files
- Adding an inventory item
- Listing all inventory items
- Finding an inventory item
- Deleting an inventory item
- Editing an inventory item
- Adding an order
- Listing all orders
- Finding order(s)
- Sorting orders by time created
- Deleting an order
- Editing an order
- Marking an order
- Getting help
- Clearing data in TrackO
- Exiting TrackO
- Editing the data file
Acknowledgements
- This application is built on code from the AddressBook-Level3 project created by SE-EDU initiative at https://se-education.org/
- Libraries used in our application: JavaFX, Jackson, JUnit5
Setting up, getting started
Refer to the guide Setting up and getting started.
Design
.puml files used to create diagrams in this document can be found in the diagrams folder. Refer to the PlantUML Tutorial at se-edu/guides to learn how to create and edit diagrams.
Architecture

The Architecture Diagram given above explains the high-level design of the App.
Given below is a quick overview of main components and how they interact with each other.
Main components of the architecture
Main has two classes called Main and MainApp. It is responsible for,
- At app launch: Initializes the components in the correct sequence, and connects them up with each other.
- At shut down: Shuts down the components and invokes cleanup methods where necessary.
Commons represents a collection of classes used by multiple other components.
The rest of the App consists of four components.
-
UI: The UI of the App. -
Logic: The command executor. -
Model: Holds the data of the App in memory. -
Storage: Reads data from, and writes data to, the hard disk.
How the architecture components interact with each other
The Sequence Diagram below shows how the components interact with each other for the scenario where the user issues the command deletei 1.

Each of the four main components (also shown in the diagram above),
- defines its API in an
interfacewith the same name as the Component. - implements its functionality using a concrete
{Component Name}Managerclass (which follows the corresponding APIinterfacementioned in the previous point).
For example, the Logic component defines its API in the Logic.java interface and implements its functionality using the LogicManager.java class which follows the Logic interface. Other components interact with a given component through its interface rather than the concrete class (reason: to prevent outside component’s being coupled to the implementation of a component), as illustrated in the (partial) class diagram below.

The sections below give more details of each component.
UI component
The API of this component is specified in Ui.java

The UI consists of a MainWindow that is made up of parts e.g.CommandBox, ResultDisplay, ItemListPanel, OrderListPanel, StatusBarFooter etc. All these, including the MainWindow, inherit from the abstract UiPart class which captures the commonalities between classes that represent parts of the visible GUI.
The UI component uses the JavaFx UI framework. The layout of these UI parts are defined in matching .fxml files that are in the src/main/resources/view folder. For example, the layout of the MainWindow is specified in MainWindow.fxml
The UI component,
- executes user commands using the
Logiccomponent. - listens for changes to
Modeldata so that the UI can be updated with the modified data. - keeps a reference to the
Logiccomponent, because theUIrelies on theLogicto execute commands. - depends on some classes in the
Modelcomponent, as it displaysOrderandInventoryItemobject residing in theModel.
Logic component
API : Logic.java
Here’s a (partial) class diagram of the Logic component:

How the Logic component works:
- When
Logicis called upon to execute a command, it uses theTrackOParserclass to parse the user command. - This results in a
Commandobject (more precisely, an object of one of its subclasses e.g.,AddOrderCommand) which is executed by theLogicManager. - The command can communicate with the
Modelwhen it is executed (e.g. to add a person). - The result of the command execution is encapsulated as a
CommandResultobject which is returned back fromLogic.
The Sequence Diagram below illustrates the interactions within the Logic component for the execute("deletei 1") API call.
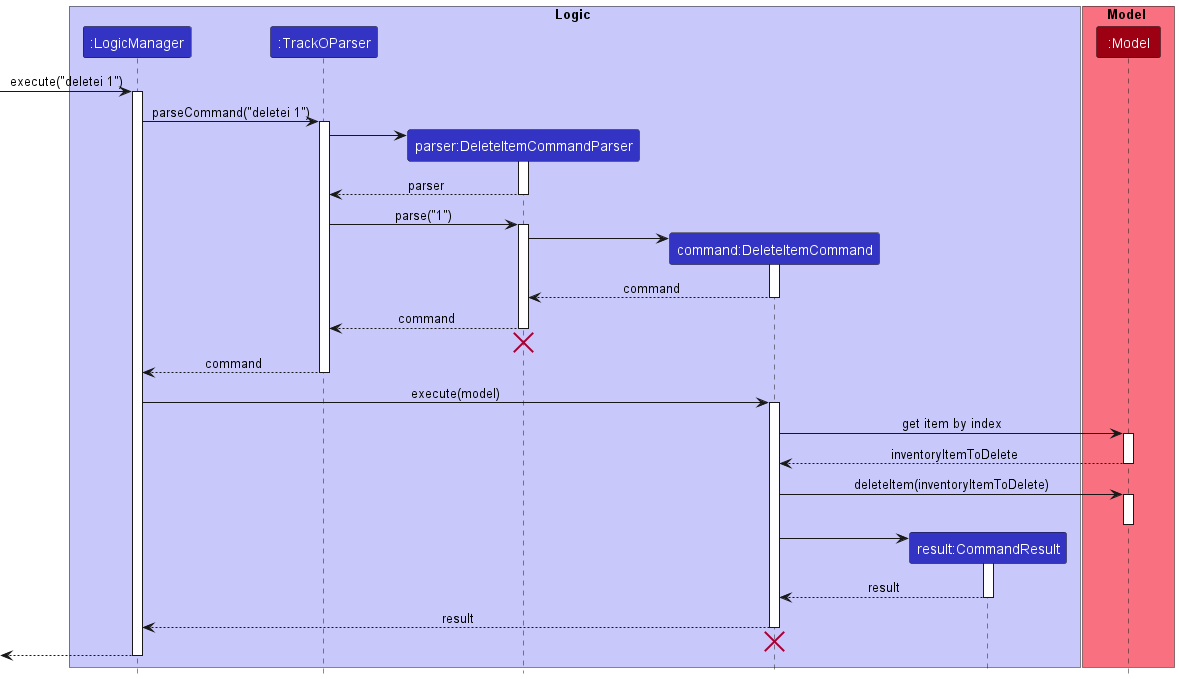
DeleteItemCommandParser should end at the destroy marker (X) but due to a limitation of PlantUML, the lifeline reaches the end of diagram.
Here are the other classes in Logic (omitted from the class diagram above) that are used for parsing a user command:

How the parsing works:
- When called upon to parse a user command, the
TrackOParserclass creates anXYZCommandParser(XYZis a placeholder for the specific command name e.g.,AddOrderCommandParser) which uses the other classes shown above to parse the user command and create aXYZCommandobject (e.g.,AddOrderCommand) which theTrackOParserreturns back as aCommandobject. - All
XYZCommandParserclasses (e.g.,AddOrderCommandParser,DeleteOrderCommandParser, …) inherit from theParserinterface so that they can be treated similarly where possible e.g, during testing.
Model component
API : Model.java

The Model component,
- stores the TrackO data i.e., all
InventoryItemandOrderobjects (which are contained in anInventoryListandOrderListobject respectively). - stores the currently ‘selected’
InventoryItemobjects (e.g., results of a search query) as a separate filtered list which is exposed to outsiders as an unmodifiableObservableList<InventoryItem>that can be ‘observed’ e.g. the UI can be bound to this list so that the UI automatically updates when the data in the list change. - stores the currently selected
Orderobjects (e.g., results of a search query) as a separate filtered list, which is wrapped within a sorted list (Orderobjects can be sorted by time of creation), which is exposed to outsiders as an unmodifiableObservableList<Order>that can be ‘observed’ e.g. the UI can be bound to this list so that the UI automatically updates when the data in the list change. - stores a
UserPrefobject that represents the user’s preferences. This is exposed to the outside as aReadOnlyUserPrefobjects. - does not depend on any of the other three components (as the
Modelrepresents data entities of the domain, they should make sense on their own without depending on other components)
Tag list in the TrackO, which InventoryItem references. This allows TrackO to only require one Tag object per unique tag, instead of each InventoryItem needing their own Tag objects.
Storage component
API : Storage.java

The Storage component,
- can save both TrackO data and user preference data in json format, and read them back into corresponding objects.
- inherits from both
TrackOStorageandUserPrefStorage, which means it can be treated as either one (if only the functionality of only one is needed). - depends on some classes in the
Modelcomponent (because theStoragecomponent’s job is to save/retrieve objects that belong to theModel)
Common classes
Classes used by multiple components are in the tracko.commons package.
Implementation
This section describes some noteworthy details on how certain features are implemented.
Inventory Management
Inventory management is one of two core features of TrackO alongside order management. These two features work together to form the backbone of the application, allowing for efficient and reliable tracking of order and inventory data.
Overview
As per the Model diagram given above, the application keeps track of one InventoryList
at any point in time. This InventoryList instance represents the container that keeps track of all inventory item
data in the system.
Currently, the application features 5 main operations that interact directly with the InventoryList. They are
represented by the following commands:
-
AddItemCommand- creates a new item to be added to theInventoryList -
FindItemCommand- filters and display matching items from theInventoryListbased on provided keywords -
ListItemCommand- display all inventory data from theInventoryList -
EditItemCommand- edit the data of an item from theInventoryList -
DeleteItemCommand- deletes an existing item from theInventoryList
The inventory management feature is supported by the InventoryItem class, represented by the class diagram below.
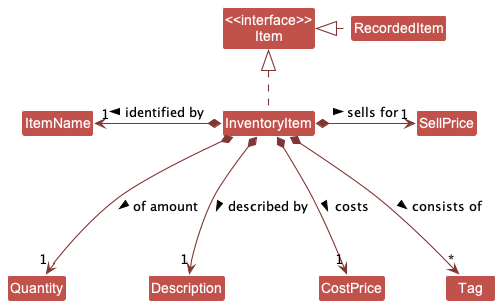
The InventoryItem class encapsulates item-related data packaged in the following classes/attributes:
-
ItemName,Description,SellPrice,CostPrice- inventory data related to theInventoryItem -
Quantity- quantity of an item currently in the inventory -
Tag- 30-character long tag to help classify items in the inventory
Add Item Feature
The add item feature allows users to add an InventoryItem to be tracked by the system.
Implementation
The add item command will be executed by AddItemCommand. Items added will be stored in InventoryList.
Given below is an example usage scenario and how the add item mechanism behaves at each step.
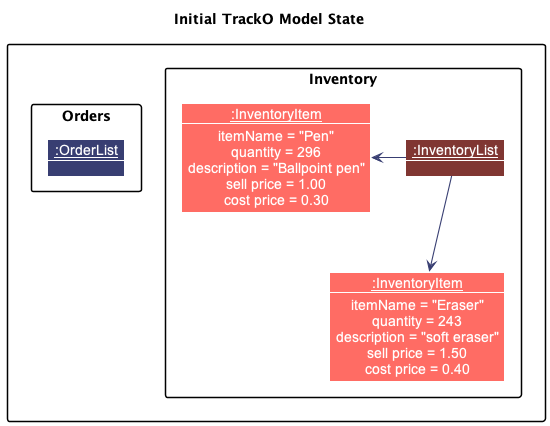
Step 1. The user launches the application for the first time. The TrackO will be initialized with the initial TrackO state, and the InventoryList will contain sample data.
The initial state of TrackO Model before running add item command will be as such.
Step 2. The user executes addi i/Key q/200 d/Cabinet keys sp/9.90 cp/4.90 t/new command to add 200 keys to the inventory list in TrackO.
The addi command creates an AddItemCommandParser which checks that the following input arguments are present
before parsing the arguments into an AddItemCommand object:
- item name (prefixed by
i/) - quantity (prefixed by
q/) - description (prefixed by
d/) - sell price (prefixed by
sp/) - cost price (prefied by
cp)
Tags (which are prefixed by t/) are optional inputs and will be parsed into the AddItemCommand
as well if they are present.
The AddItemCommand calls Model#addItem() to add the item and its corresponding quantity into the inventory list.
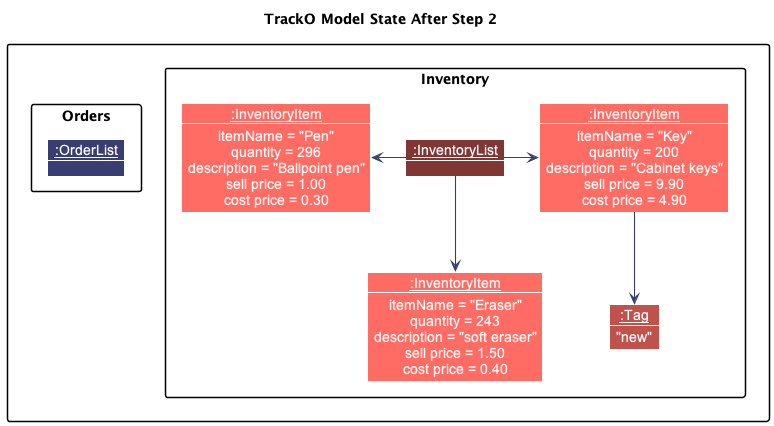
Model#addItem(), so the incomplete item will not be saved to InventoryList.
The following sequence diagram shows how the add item operation works:
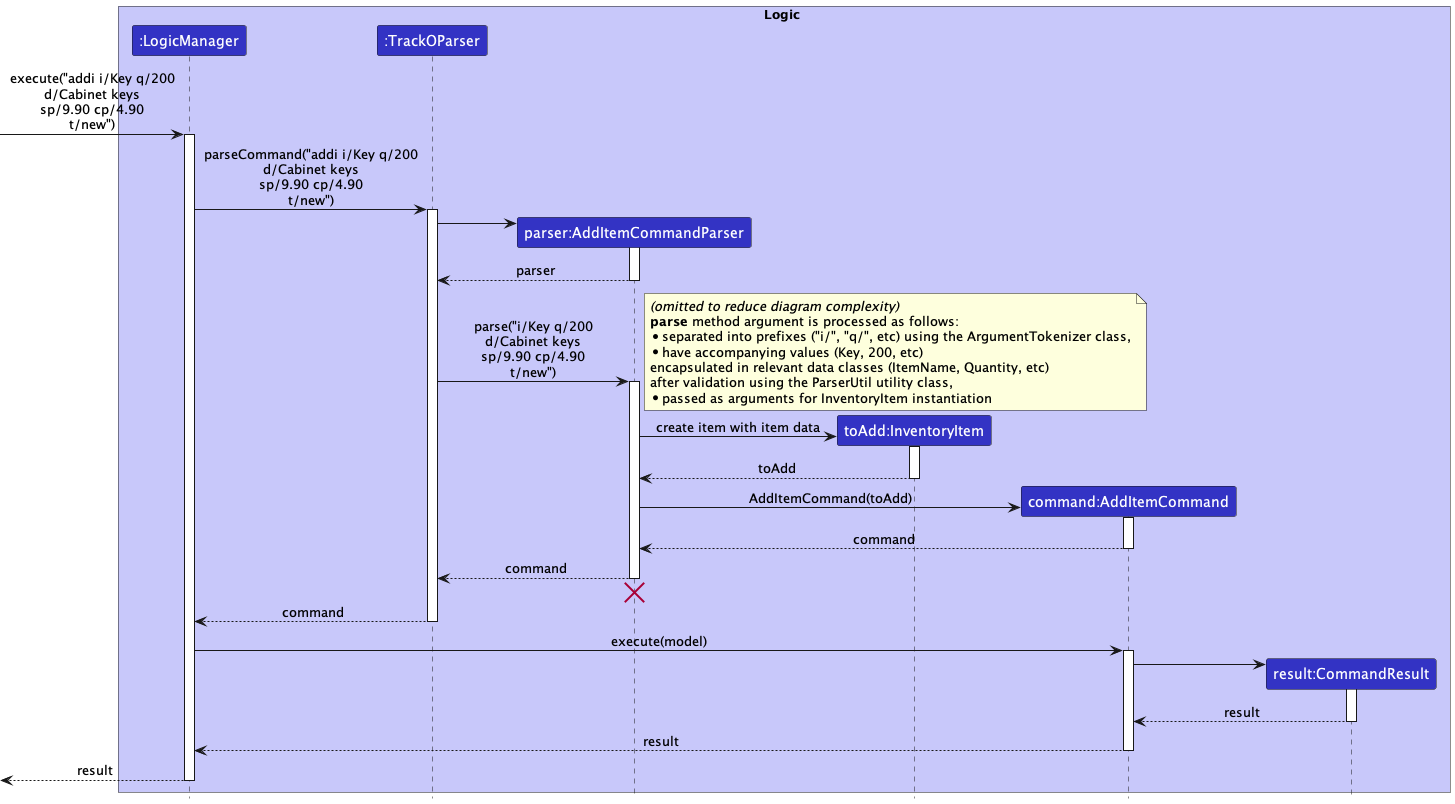
AddItemCommand should
end at the destroy marker (X) but due to a limitation of PlantUML, the lifeline reaches the end of diagram.
The following activity diagram summarizes what happens when a user executes a new command:
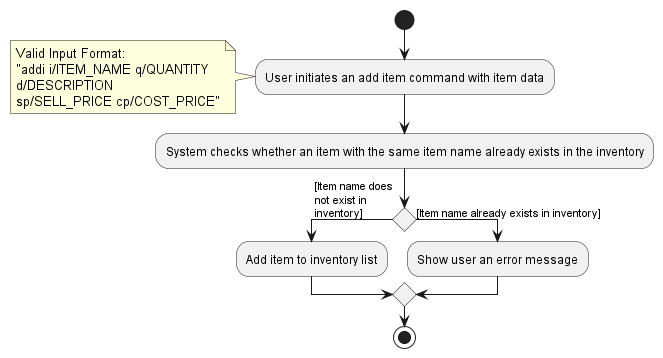
Design considerations
Aspect: How add item executes:
-
Alternative 1 (current choice): User inputs all required fields in a single input
- Pros: easier to implement
- Cons: user input is very long and may be more prone to typos
Delete Item Feature
The delete item feature allows the user to delete an InventoryItem currently being tracked by the system.
Implementation
The delete item command deletei is supported by the DeleteItemCommand. It extends Command.
Given below is an example usage scenario and how the edit item mechanism behaves at each step.
Step 1. The user inputs the command deletei 1. This calls:
LogicManager#execute()-
TrackOParser#parseCommand(). This parses the command as anDeleteItemCommandand returns aDeleteItemCommandParserobject. -
DeleteItemCommandParser#parse()parses the arguments and returns anDeleteItemCommandwith the targetIndex.
Step 2. DeleteItemCommand#execute() is called and the DeleteItemCommand calls Model#deleteItem() which deletes
the InventoryItem at the target Index from the Model.
The sequence diagram below illustrates this process.

DeleteItemCommandParser and DeleteItemCommand should end at
the destroy marker (X) but due to a limitation of PlantUML, the lifeline reaches the
end of diagram.
Design Considerations
Aspect: How deletei is implemented
-
Alternative 1 (current choice): The command deletes the target
InventoryItembased on the targetIndex.- Pros: Easier to implement,
- Cons: The user must check for the
InventoryItemfor itsIndex.
-
Alternative 2: The command can delete
InventoryItemobjects based on theirItemName.- Pros: User do not need to check for the
InventoryItemobject’sIndex. - Cons: Harder to implement.
- Pros: User do not need to check for the
List Items Feature
The list items feature allows the user to list all the existing InventoryItems in the inventory.
Implementation
The list item feature is supported by the ListItemsCommand. It extends Command.
Given below is an example usage scenario and how the ListItemsCommand mechanism behaves at each step.
Step 1. The user inputs listi. This calls LogicManager#execute(), which then calls TrackOParser#parseCommand().
This method will return a new instance of ListItemsCommand.
Step 2. ListItemsCommand#execute() is called, which then calls the method
Model#updateFilteredOrderList(PREDICATE_SHOW_ALL_ITEMS). This will show all the InventoryItems in the existing
inventory list.
The sequence diagram below illustrates this process.
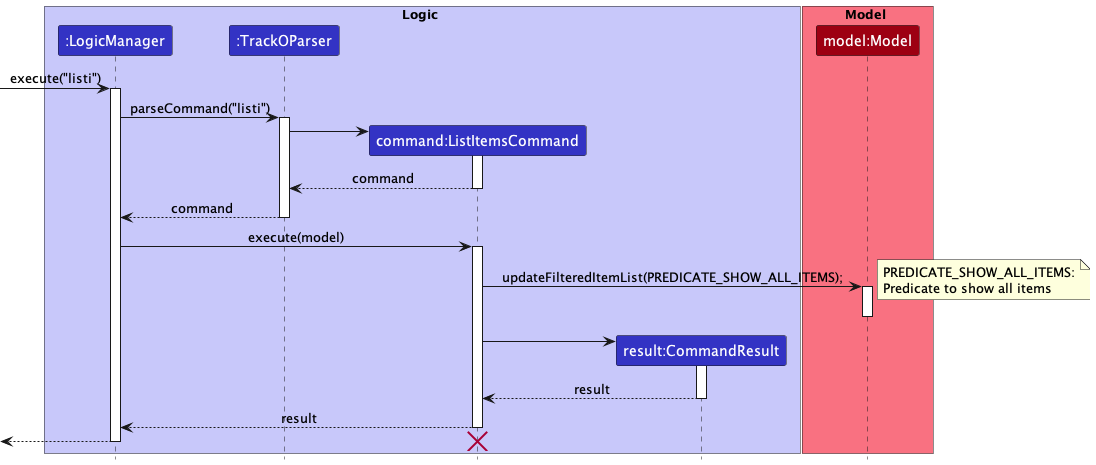
ListItemsCommand
should end at the destroy marker (X) but due to a limitation of PlantUML, the lifeline
reaches the end of diagram.
Design Considerations
Aspect: How the listi command executes
-
Alternative 1 (current choice): The command lists all the items in the inventory list.
- Pros: Easier to implement.
- Cons: Unable to filter specific items.
Find Item Feature
The find item feature allows the user to find InventoryItem(s) by keyword(s) given by the user.
Implementation
The find item command is supported by FindItemCommand. It extends Command.
Given below is an example usage scenario and how the find item mechanism behaves at each step.
Step 1. The user executes findi chair mattress command to find the items with the keywords
chair or mattress. The findi command calls FindItemCommandParser which checks for the correct command
syntax and separates the keywords, utilising each space as a delimiter.
Step 2. The keywords are then passed into a constructor for ItemContainsKeywordsPredicate,
which extends Predicate<InventoryItem>, to construct a predicate that will filter the items according to the keywords.
The predicate is passed into a new instance of FindItemCommand. FindItemCommand then calls
Model#updateFilteredItemList() to filter Model#filteredOrders according to the previously constructed
ItemContainsKeywordsPredicate.
The sequence diagram below illustrates this process.

FindItemCommandParser
and FindItemCommand should end at the destroy marker (X) but due to a limitation of PlantUML, the lifeline
reaches the end of diagram.
Design Considerations
Aspect: How findi is implemented
-
Alternative 1 (current choice): The command finds items based on their
ItemName.- Pros: Easier to implement, and users do not have to use prefixes to find items.
- Cons: Cannot search based on other item fields, e.g. searching based on the price range of the items.
-
Alternative 2: The command can find items based on all of their fields.
- Pros: Can search based on more fields, useful if the user has large number of items to navigate through.
- Cons: Harder to implement.
Edit Item Feature
The edit item feature allows the user to edit an InventoryItem currently being tracked by the system.
Implementation
The edit item command editi is supported by the EditItemCommand. It extends Command.
Given below is an example usage scenario and how the edit item mechanism behaves at each step.
Step 1. The user inputs the command editi 1 i/Chair q/20. This calls:
LogicManager#execute()-
TrackOParser#parseCommand(). This parses the command as anEditItemCommandand returns anEditItemCommandParserobject. -
EditItemCommandParser#parse()parses the arguments and returns anEditItemCommandwith the targetIndexand the appropriateEditItemDescriptoras input.
The EditItemDescriptor contains information which the newly edited InventoryItem
should have and is used in the creation of the new InventoryItem object. In this case, the EditItemDescriptor contains a new
ItemName and Quantity taken from the user input, while all other fields are copied from the existing InventoryItem at the
target Index 1.
Step 2. EditItemCommand#execute() is called and the EditItemCommand creates a new InventoryItem using createEditedItem() and the EditItemDescriptor.
It then checks if this InventoryItem already exists in the inventory list by using Model#hasItem(). If it already exists, a
CommandException is thrown with MESSAGE_DUPLICATE_ITEM.
An item already exists if there is another item in the
inventory list with same ItemName. InventoryItem#isSameItem() returns true when both InventoryItem have the same ItemName. This is
because having 2 InventoryItem with the same ItemName can be confusing to the user and this safeguards the user from such a
situation.
Step 3. The InventoryItem at the target index is then replaced by the newly created InventoryItem using Model#setItem(),
successfully executing the edit item command in the Model.
The sequence diagram below illustrates this process.
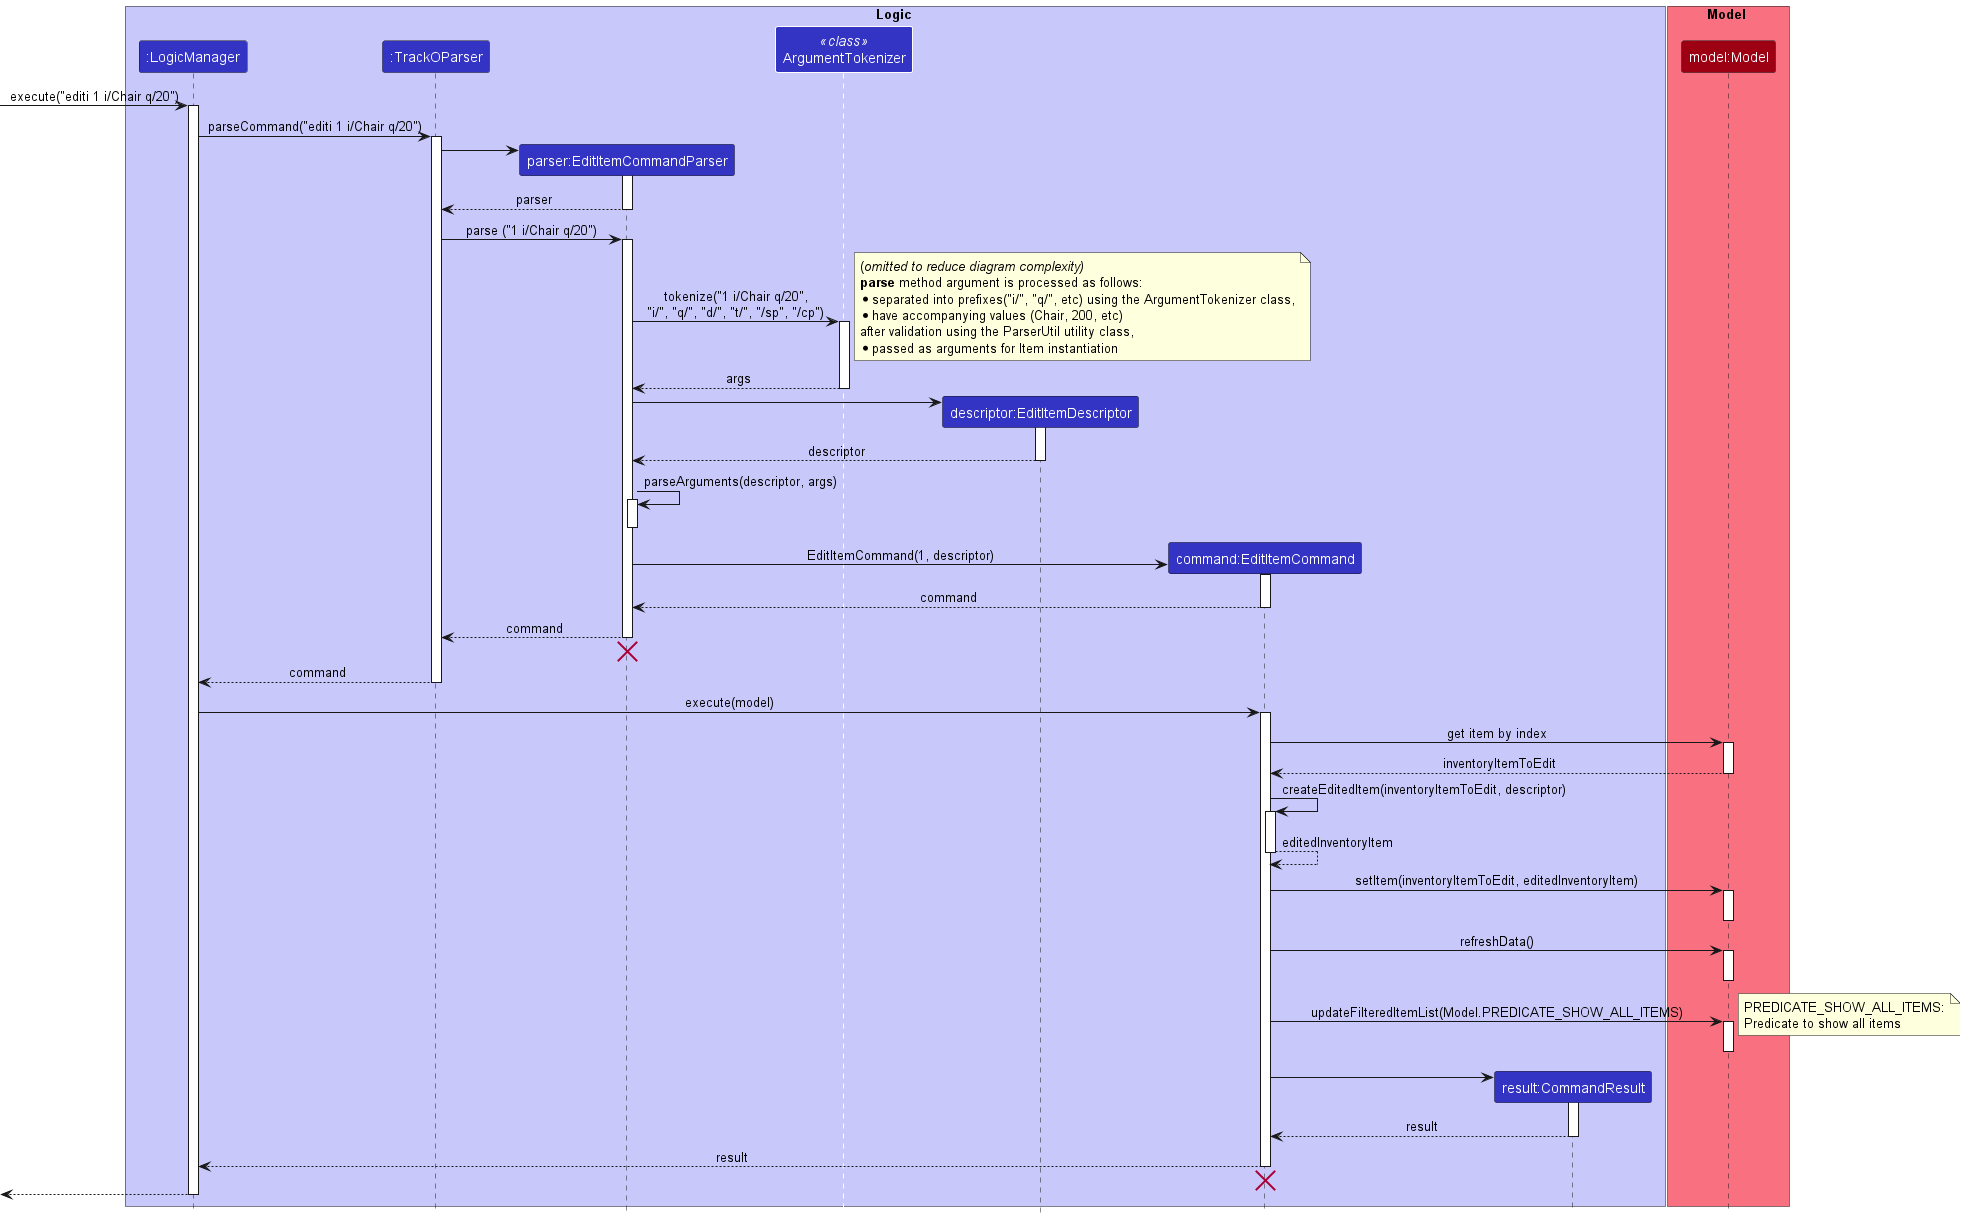
EditItemCommandParser should end at
the destroy marker (X) but due to a limitation of PlantUML, the lifeline reaches the
end of diagram.
Design Considerations
Aspect: Whether to implement the edit item feature
-
Alternative 1 (current choice): The command is implemented and edits the item based on the prefixes
inputted by the user.
- Pros: The user can edit only the fields that they want to edit.
- Cons: The user may have to input long commands.
-
Alternative 2: No edit command, users have to delete and re-add items should there be any change.
- Pros: Less bug-prone, more convenient for the developers to implement.
- Cons: Not user-friendly and makes things more difficult for the user.
Order Management
Order management is one of two core features of TrackO alongside inventory management. These two features work together to form the backbone of the application, allowing for efficient and reliable tracking of order and inventory data.
Overview
As per the Model diagram given above, the application keeps track of one OrderList
at any point in time. This OrderList instance represents the container that keeps track of all order data in the system.
Currently, the application features 5 main operations that interact directly with the OrderList. They are represented by
the following commands:
-
AddOrderCommand- creates a new order to be added to theOrderList -
FindOrderCommand- filters and display matching orders from theOrderListbased on provided keywords -
ListOrderCommand- display all order data from theOrderList -
EditOrderCommand- edit the data of an order from theOrderList -
DeleteOrderCommand- deletes an existing order from theOrderList -
MarkOrderCommand- marks an existing order from theOrderListas paid or delivered
The order management feature is supported by the Order class, represented by the class diagram below.
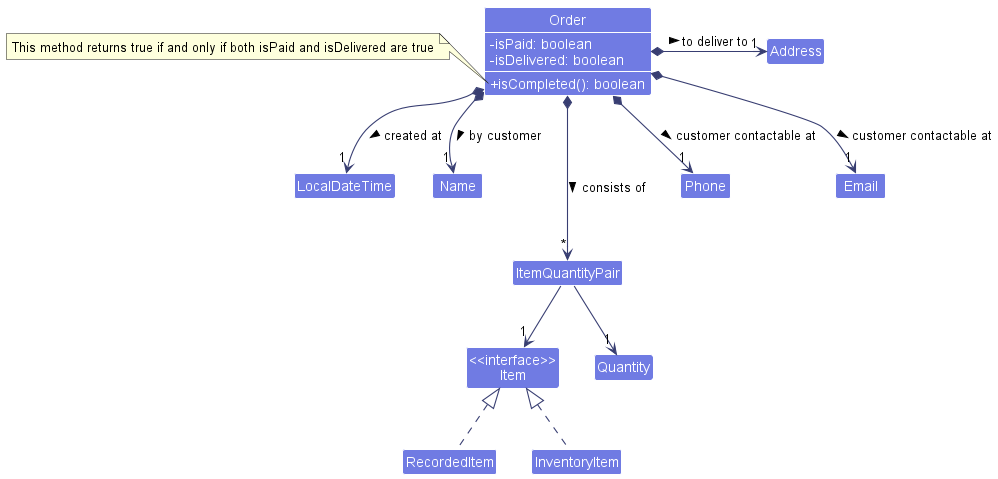
The Order class encapsulates order-related data packaged in the following classes/attributes:
-
Name,Phone,Email,Address- customer data related to theOrder -
ItemQuantityPair- represents an orderedInventoryItemin theOrder, with an accompanyingQuantitythat represents the amount of units of saidInventoryItemordered by the customer -
LocalDateTime- the time at which the order entry was created in the system -
isPaid/isDelivered- represents the completion status of the order (anOrderis considered complete if both fields are true)
Add Order Feature
The add order feature allows the user to add an Order to be tracked by the system.
Implementation
The add order feature is supported by the AddOrderCommand, which extends from the MultiLevelCommand class.
The user will enter multiple rounds of input before an Order is successfully added to the system.
Before giving an example usage scenario, lets assume that the user has already added some inventory items to be tracked by the system, but has not added any orders yet. Hence, our initial state before the add order command is initiated is illustrated as such.
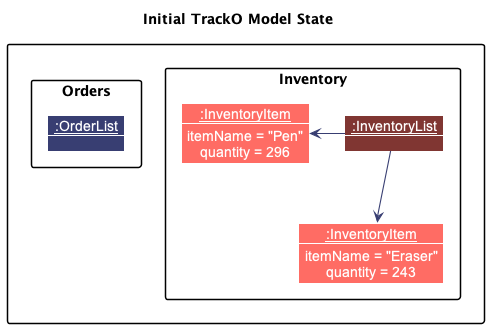
Given below is an example usage scenario that works with the given model state as depicted above, and how the add order mechanism behaves at each step.
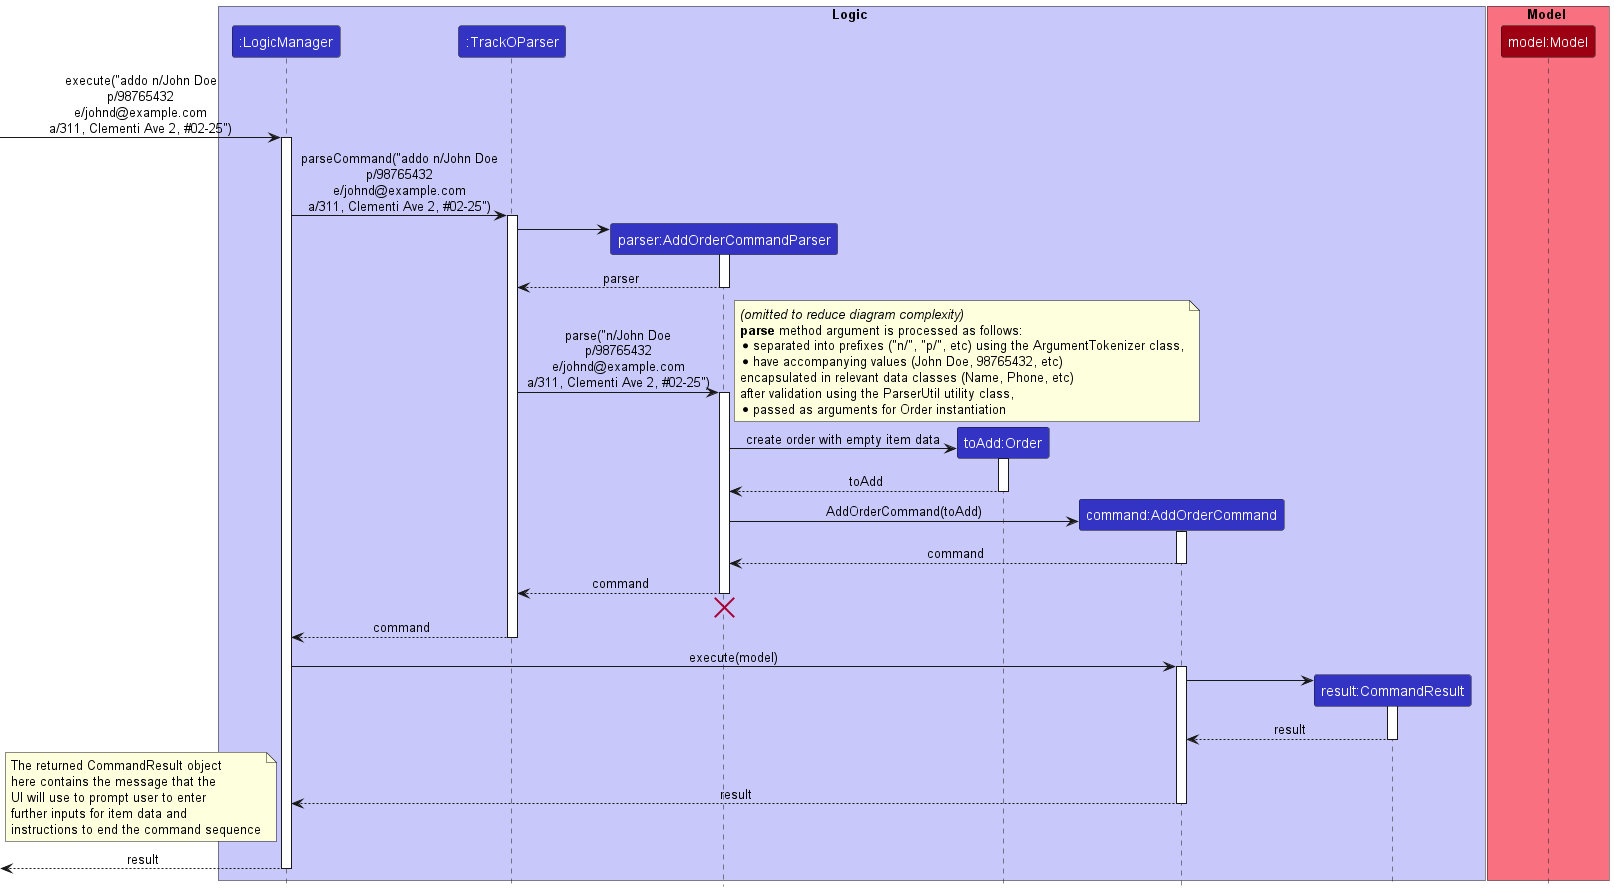
Step 1. The user enters the following input into the UI’s command box:
addo n/John Doe p/98765432 e/johnd@example.com a/311, Clementi Ave 2, #02-25. This instantiates an AddOrderCommand, that references
a new Order which encapsulates the input customer data. This then sets the LogicManager to reference said instantiated AddOrderCommand
in its inProgressCommand field. The UI then prompts the user for further input.
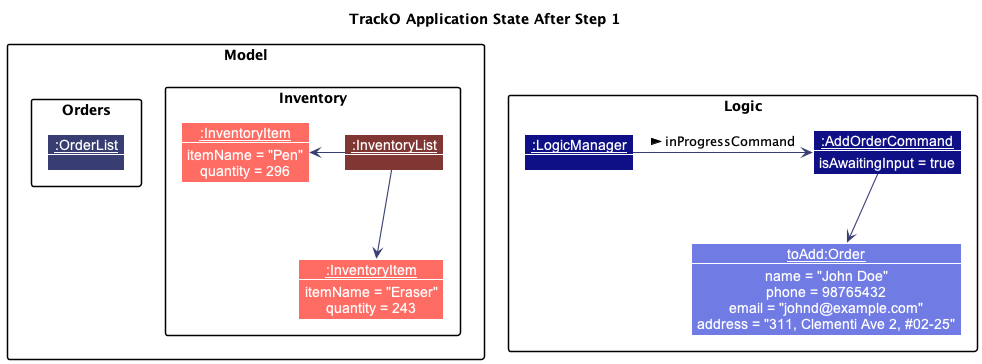
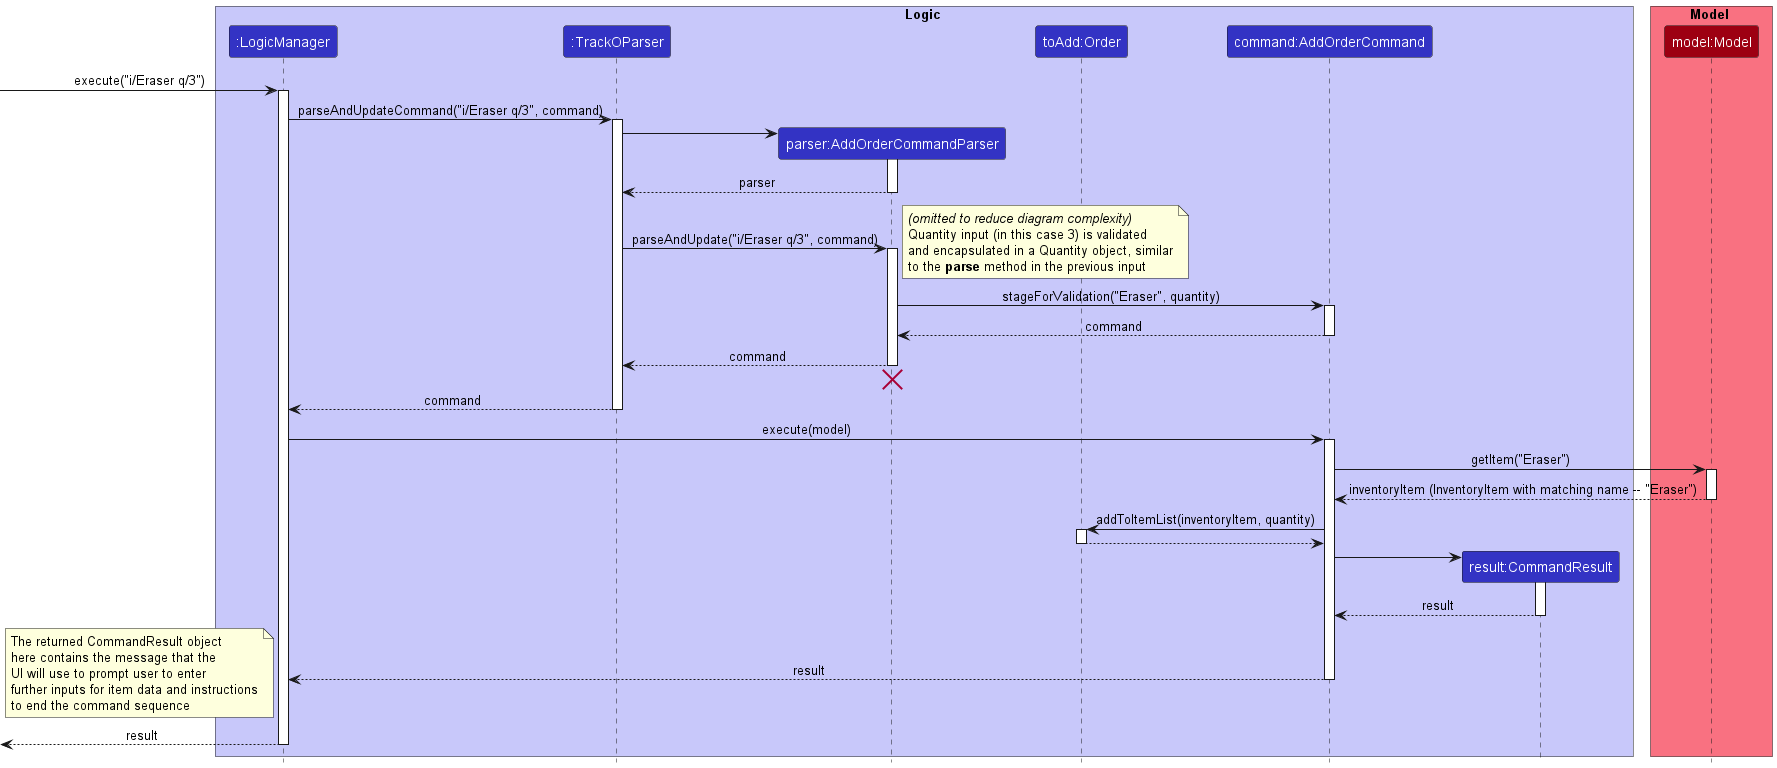
Step 2a. The user then enters i/Eraser q/3, representing that the order requires 3 quantities (or units) of Erasers to fulfill.
The system updates the instantiated command, by first having the AddOrderCommand stage the input item name and quantity for validation,
using the AddOrderCommand#stageForValidation() method.

Step 2b. On the AddOrderCommand#execute() method call, the system searches the model’s inventory for an item that has a matching name to the user’s input item name.
In this scenario, we assume that the user has already added an InventoryItem with its ItemName value to be Eraser, to the model’s list of tracked InventoryItems.
Hence, upon execution, a valid item will be found based on the user’s input item name, and the Order#addToItemList() method is called on the toAdd object, with the found
InventoryItem in the model and Quantity object that was previously staged for validation as method parameters.
This adds a new ItemQuantityPair object that references the found InventoryItem and given Quantity to the list of ordered items in the toAdd object.
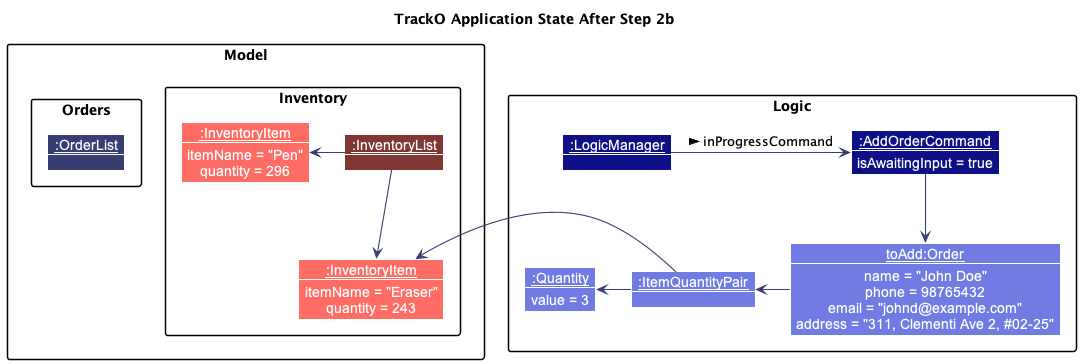
Step 3. The user repeats Step 2 multiple times to fill up the instantiated Order’s list of ordered items.

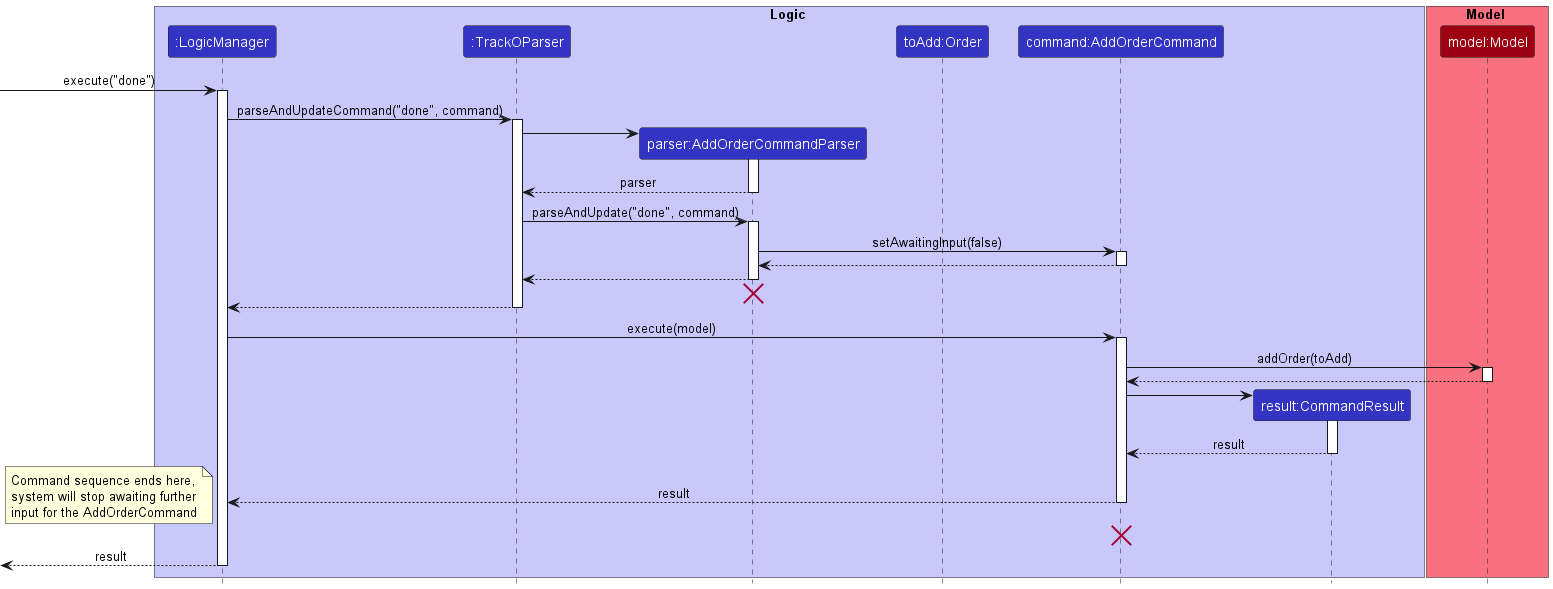
Step 4. The user then enters done after inputting all the required order item details. On the following AddOrderCommand#execute() method call,
the AddOrderCommand will no longer await input, and the LogicManager also removes its reference to the AddOrderCommand.
The built up Order object is finally added to the model’s OrderList.
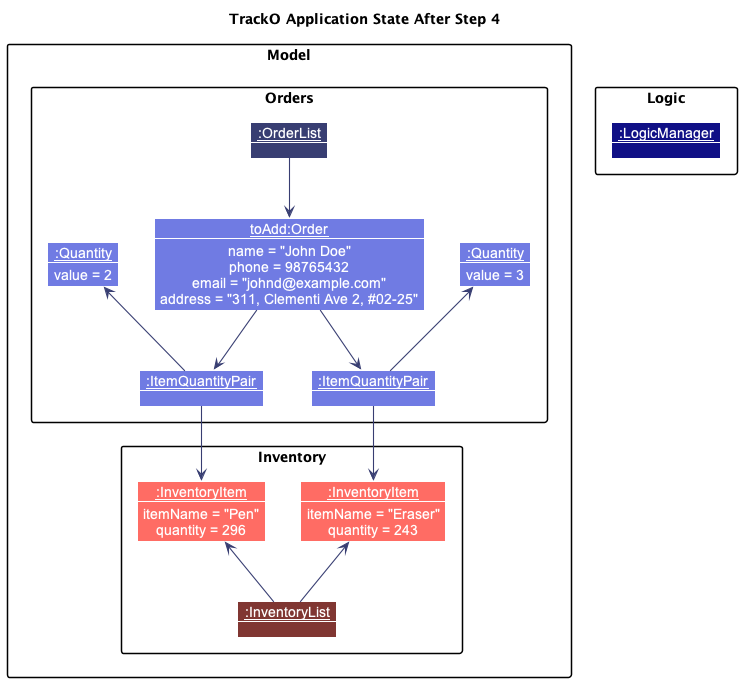
The following sequence diagrams show how the add order feature works for a user entering an order with only one ordered item. Take note that the sequences occurring in the following diagrams are meant to occur in one full sequence (under one diagram) but for readability, have been separated into 3 smaller diagrams.
-
Initiating the add order command (Step 1)
-
Adding item details (Step 2a, 2b, 3)
-
Adding item details (Step 4)
The following activity diagram below illustrates the general flow of the user’s experience in adding an order.
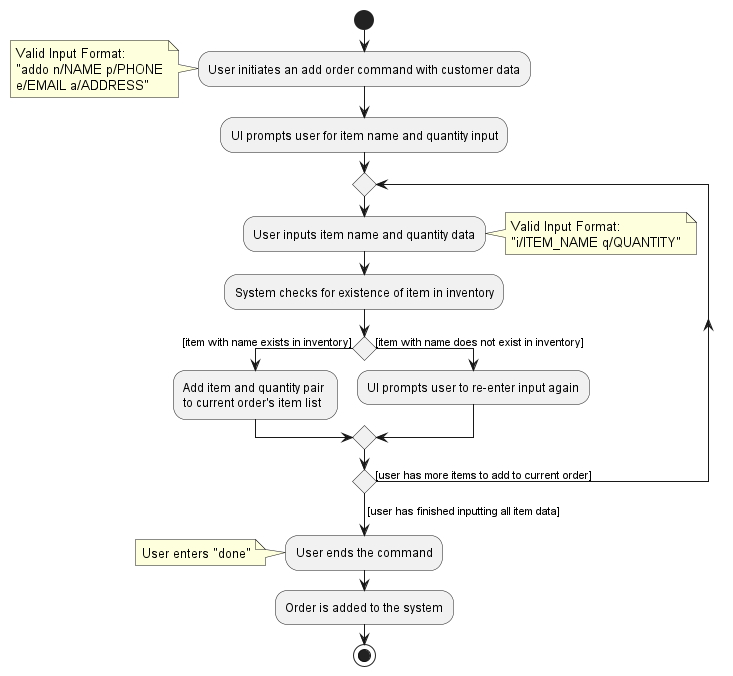
Design considerations
Aspect: How the add order command receives input and executes
-
Alternative 1: Single level command, user inputs all required information in one long command.
- Pros: Easier to implement as the implementation will follow the already in-place command execution structure.
- Cons: Users have to type out a very long command, and multiple times if they were to mistype certain details and have to re-enter data (e.g, enter multiple instances of
i/ITEM_NAME q/QUANTITYon the same line of input).
-
Alternative 2 (current choice): Multi-level command. User enters inputs in levels (customer data -> multiple iterations of item/quantity information -> “done”/”cancel” ).
- Pros: Better user experience. Users can be sure that any previously entered input is already validated by the application, making it less overwhelming to input large amounts of information.
- Cons: Harder to implement as it deviates from the original command execution structure (where one instance of user input relates to one full command execution).
Find Order Feature
The find order feature allows the user to find an Order to be tracked by the system.
Implementation
The find order command is supported by FindOrderCommand. It extends Command.
Given below is an example usage scenario and how the find order mechanism behaves at each step.
Step 1. The user launches the application for the first time. TrackO will be initialised with the initial TrackO
state, and the OrderList will contain sample data.
Step 2. The user executes findo -D -p n/Alex a/Serangoon command to find the orders which are paid but not
delivered made by customer with the Name Alex and Address containing the word Serangoon. The findo
command calls FindOrderCommandParser which checks for the correct command syntax and separates the keywords,
utilising each space as a delimiter. The keywords are then passed as a List into a constructor for
OrderMatchesFlagsAndPrefixPredicate, which extends Predicate<Order>, to construct a predicate
that will filter the items according to the keywords. The predicate is passed into a new instance of
FindOrderCommand. FindOrderCommand then calls Model#updateFilteredOrderList() to filter
Model#filteredOrders according to the predicate.
FindOrderCommandParser will throw a ParseException.
The following sequence diagram shows how the find order command works:
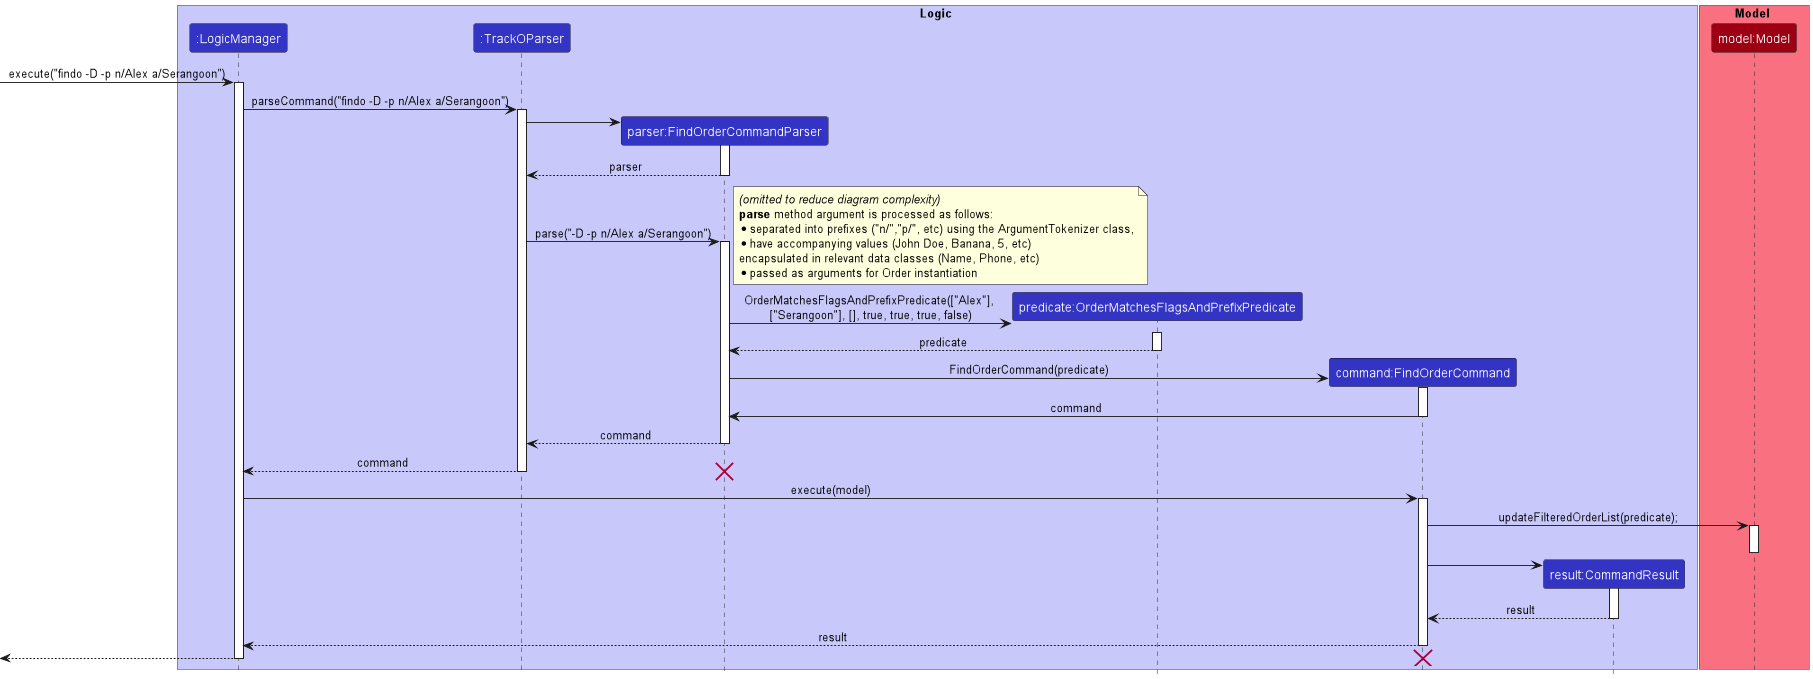
FindItemCommandParser
and FindItemCommand should end at the destroy marker (X) but due to a limitation of PlantUML, the lifeline
reaches the end of diagram.
The following activity diagram summarizes what happens when a user executes a valid find order command:
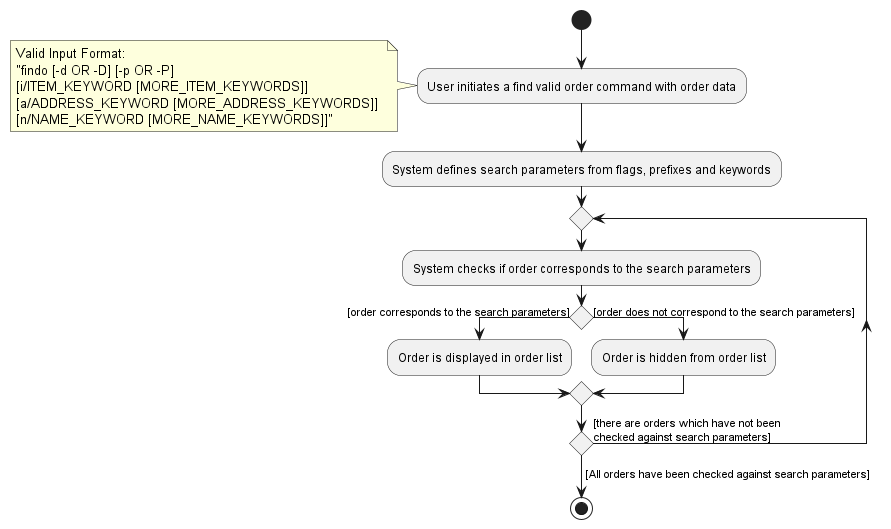
Design considerations
Aspect: What fields the find order command should search by:
-
Alternative 1: The command finds orders based on the
ItemNameof ordered items of each other.- Pros: Easier to implement, and users do not have to use prefixes to find items.
- Cons: Cannot search based on other fields, such as the customer’s details (eg. name, address) and order’s delivery or payment status.
-
Alternative 2 (current choice): The command finds orders based on
ItemName,Name,Address, delivery status and payment status.- Pros: More robust searching functionality, allowing users to search by more fields at once. This benefits users with a large customer base. The ability to search by delivery and payment status also allows users to keep track of the orders which have yet to be paid/delivered.
- Cons: Harder to implement.
Edit Order Feature
The edit order feature allows the user to edit an Order currently tracked by the system.
Implementation
The edit order feature is supported by EditOrderCommand. It extends Command.
Given below is an example usage scenario and how the EditOrderCommand mechanism behaves at each step.
Step 1. The user inputs edito 3 n/John Doe i/Banana q/5. The following methods are called, in the given order:
-
LogicManager#execute, which then calls -
TrackOParser#parseCommand. It will parse the input as anEditOrderCommandand call the constructor ofEditOrderCommandParser. -
EditOrderCommandParser#parsewill parse the user command based on the prefixes given by the user, and returns anEditOrderCommandwith the target index andEditOrderDescriptoras input.
The EditOrderDescriptor contains information that a newly edited order should have; in this case,
it contains a Name, InventoryItem, and Quantity. The rest of the fields that are not provided are copied from the existing
order at target index 3 (This index is one-based).
Step 2. EditOrderCommand#execute is called, and it will check whether the orderToEdit is completed; if it is, it
will throw a CommandException with MESSAGE_ORDER_ALREADY_COMPLETED. Otherwise, the method continues to run.
Step 3. The EditOrderCommand#createEditedOrder creates an edited order using the information in the
EditOrderDescriptor. When the user inputs an InventoryItem and Quantity, it checks whether:
-
the
InventoryItemexists in theInventoryList.- If it does not exist, the method will throw a
CommandExceptionwithMESSAGE_NONEXISTENT_ITEM. This is because customers cannot order things that are not in stock. - If it exists, the method will keep running.
- If it does not exist, the method will throw a
-
the
InventoryItemexists in theOrder’s list of ordered items, which is stored as aList<ItemQuantityPair>. This is done byInventoryItem#isSameItem, which returns true if both the newly inputtedInventoryItemand theInventoryItemreferenced inItemQuantityPairshare the sameItemName(case-insensitive).- If it does not exist, then the
InventoryItemandQuantitywill form a new instance ofItemQuantityPairwhich will be added to theList<ItemQuantityPair>. - If it exists, it will check whether:
- The
Quantityis0. If it is, then:- If the order’s list of ordered items has more than one
ItemQuantityPairwill be removed from theList<ItemQuantityPair>. - If the order’s list of ordered items has only one
ItemQuantityPair, then aCommandExceptionwithMESSAGE_ONE_ORDERED_ITEMwill be thrown. This is because an order cannot have zero ordered items.
- If the order’s list of ordered items has more than one
- The newly inputted
Quantityis different from the existingQuantity. If it is, then it will update to the newly inputtedQuantity.- Otherwise, a
CommandExceptionwithMESSAGE_NO_CHANGE_IN_QUANTITYwill be thrown. This is to warn users that the newly inputtedQuantityis the same as the existingQuantityand does not update theQuantityfield at all.
- Otherwise, a
- The
- If it does not exist, then the
Step 4. The Order at the target index is then replaced by the newly created Order using Model#setOrder(),
successfully executing the edit order command in the Model. Model#refreshData is called to refresh the GUI, and
Model#updateFilteredOrderList(PREDICATE_SHOW_ALL_ORDERS) is called to update the list to show all orders.
EditOrderCommand#execute() returns a CommandResult to the LogicManager.
The sequence diagram below illustrates this process.
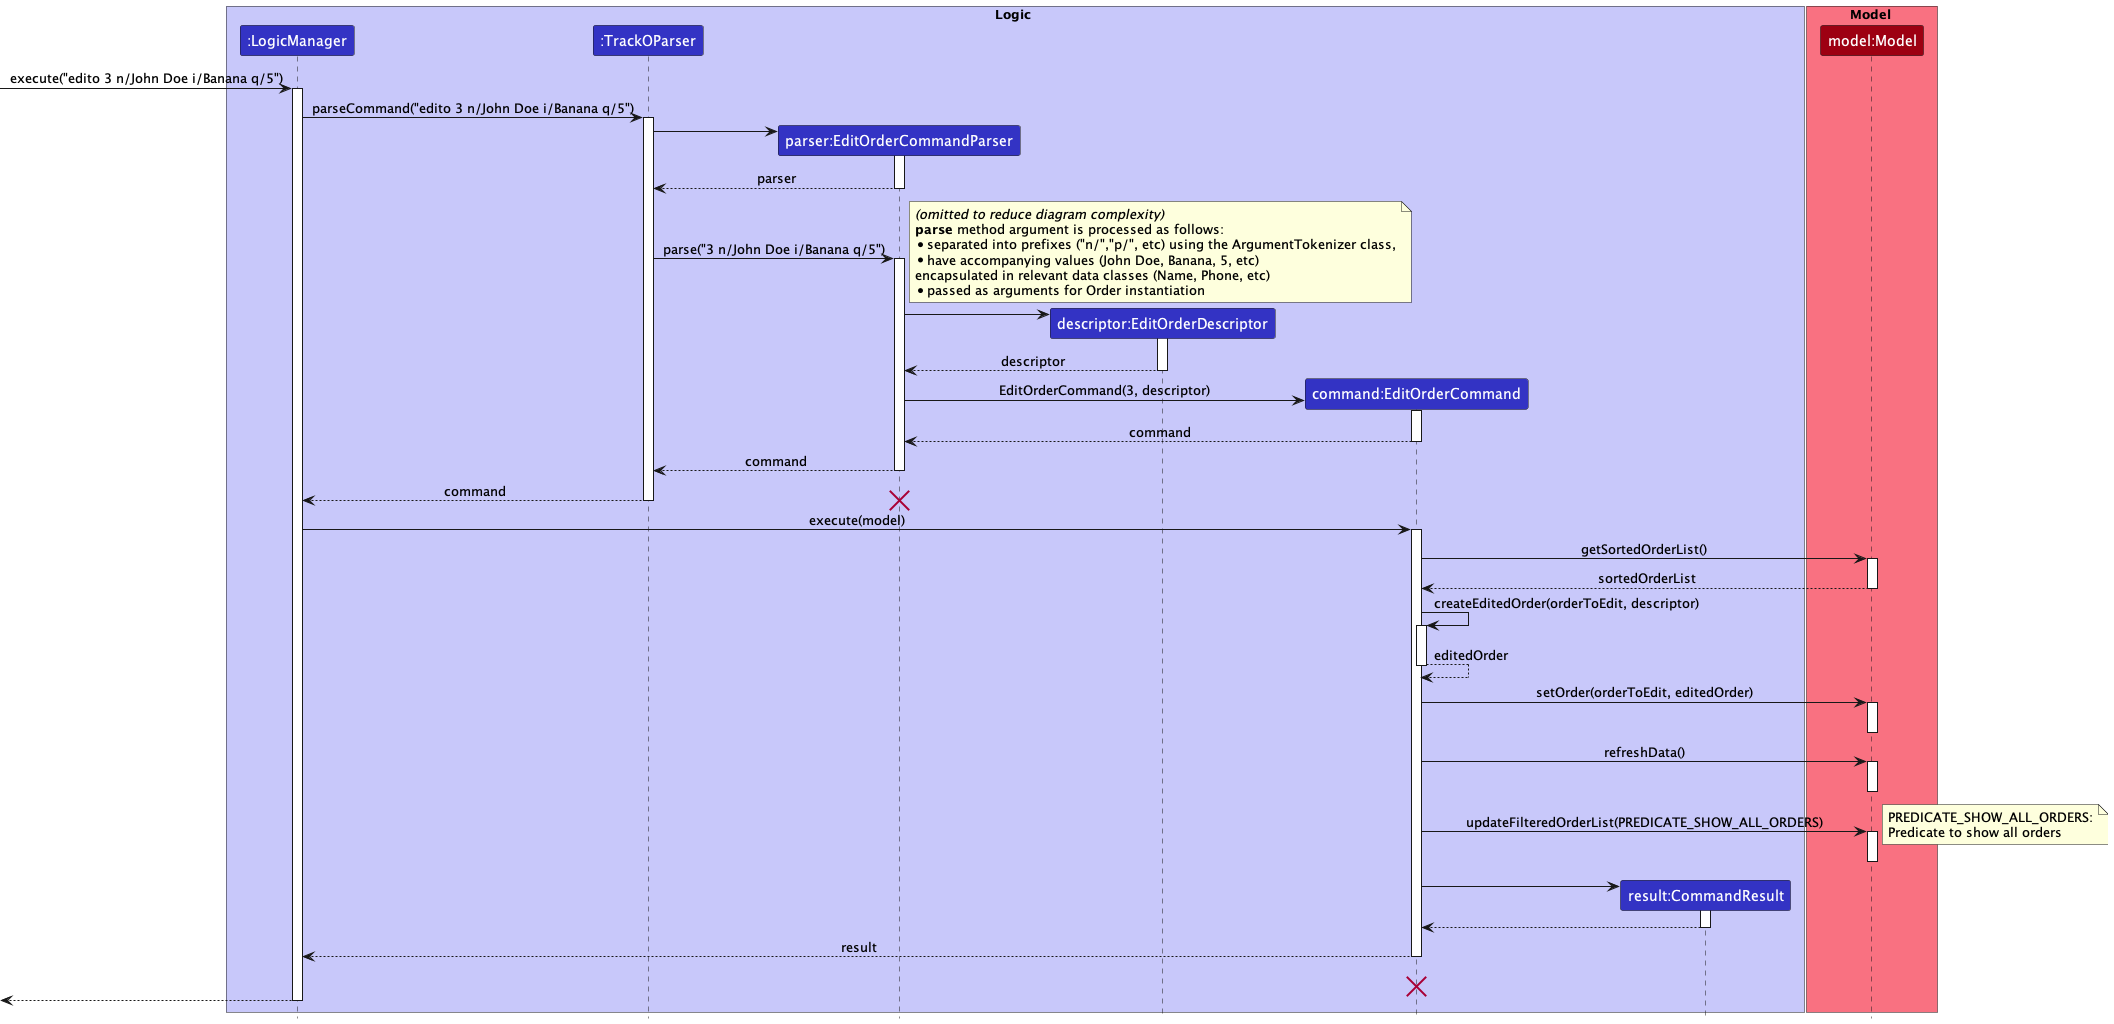
EditOrderCommandParser
and EditOrderCommand should end at the destroy marker (X) but due to a limitation of PlantUML, the lifeline reaches the end of diagram.
Design Considerations
Aspect: Whether to implement the edit order feature
-
Alternative 1 (current choice): The command is implemented and edits the order based on the prefixes
inputted by the user.
- Pros: The user can edit only the fields that they want to edit.
- Cons: The user may have to input long commands.
-
Alternative 2: No edit command, users have to delete and re-add orders should there be any change.
- Pros: Less bug-prone, more convenient for the developers to implement.
- Cons: Not user-friendly and makes things more difficult for the user.
Sort Orders Feature
The sort orders feature allows the user to sort all the displayed order list based on their time of creation.
Implementation
The sort orders feature is supported by the SortOrdersCommand. It extends Command. This command is implemented by
wrapping a SortedList around the FilteredList in ModelManager. The command must be used with at least 1 of the
2 different keywords: new or old.
Given below is an example usage scenario and how the SortOrdersCommand mechanism behaves at each step.
Step 1. The user inputs the command sorto new. This calls:
LogicManager#execute()-
TrackOParser#parseCommand(). This parses the command as anSortOrdersCommandParserand returns aSortOrdersCommandParserobject. -
SortOrdersCommandParser#parse()parses the arguments and creates anOrderDateTimeComparatorbased on the input keywordnew. ASortOrdersCommandobject with theOrderDateTimeComparatoris returned.
The OrderDateTimeComparator determines the order in which the SortedList should be sorted and is created based on the
keywords new or old.
Step 2. SortOrdersCommand#execute() is called and the SortOrdersCommand calls Model#updateSortedOrderList which
updates the comparator used for the sortedList in ModelManager.
The sequence diagram below illustrates this process.
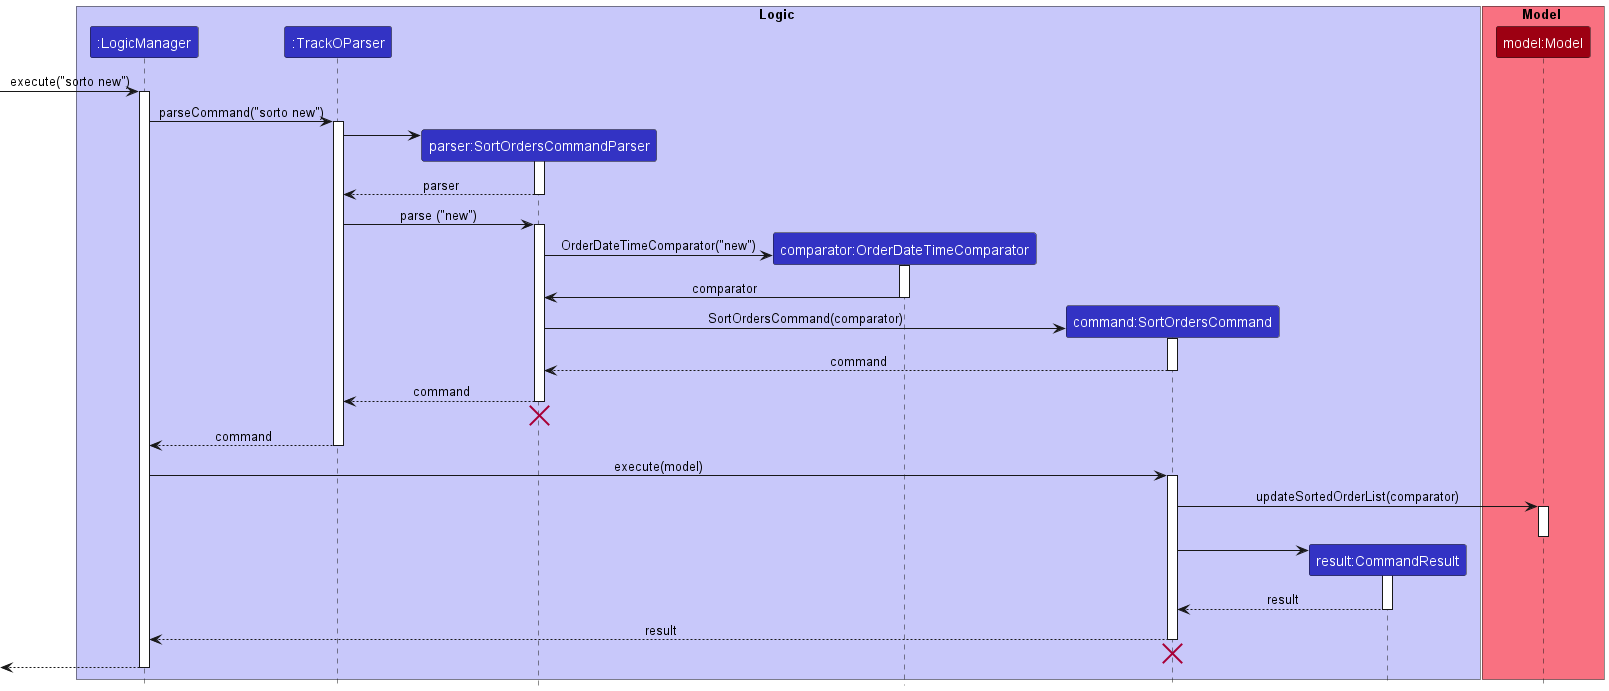
SortOrdersCommandParser and SortOrdersCommand
should end at the destroy marker (X) but due to a limitation of PlantUML, the lifeline
reaches the end of diagram.
Design Considerations
Aspect: Sorting criteria for sorto command
-
Alternative 1 (current choice): The command sorts all the orders in the order list by time created.
- Pros: Easier to implement.
- Cons: User can only sort by order’s time of creation.
-
Alternative 2: The command allows the user to sort by different criteria based on order details.
- Pros: User has more flexibility while sorting orders.
- Cons: Harder to implement.
Documentation, logging, testing, configuration, dev-ops
Appendix A: Product scope
Target user profile:
- home-based small business owners who want to manage orders and inventory information efficiently
- prefer desktop apps over other types
- can type fast
- prefers typing to mouse interactions
- is reasonably comfortable using CLI apps
Value proposition: offers a CLI-based application for home-based small business owners who prefer to type more/are more efficient at typing to allow them to save time on managing orders and logistics instead of traditional GUI applications such as Excel, or even pen and paper.
Appendix B: User stories
Priorities: High (must have) - * * *, Medium (nice to have) - * *, Low (unlikely to have) - *
| Priority | As a … | I want to … | So that I can… |
|---|---|---|---|
* * * |
business owner | add orders easily | keep track of ongoing orders |
* * * |
business owner | delete entire orders | |
* * * |
business owner | list all orders | see all my ongoing orders in one place and keep track of them |
* * * |
business owner | add items to my inventory | keep track of additions to my inventory |
* * * |
business owner | delete items from my inventory | have an updated list of inventory items |
* * * |
business owner | list all items in my inventory | see all items in my inventory in one place |
* * * |
business owner | tag inventory items | keep an organised inventory of items |
* * |
business owner | find orders | locate an order without manually searching through the entire list |
* * |
business owner | find items in my inventory | locate an item in my inventory without manually searching through the entire list |
* * |
business owner | edit order details | update changes to orders |
* * |
business owner | edit inventory item details | update changes to inventory |
* * |
business owner | see which orders have been paid for | press customers for payment |
* * |
business owner | mark orders as completed | not get mixed up with ones that have not been completed yet |
* * |
business owner | sort orders by expected delivery time | know which orders are due first |
* * |
business owner | sort orders by delivery address | optimise delivery routes |
* * |
business owner | sort orders by urgency (e.g. by deadline, or days outstanding) | know which orders I have to prepare first |
* * |
business owner | look at my total earnings | better optimise my earnings |
* |
business owner | export all business data | save the data elsewhere if needed |
* |
business owner who is new to the application | import my current database of order and inventory information to TrackO | seamlessly transfer from other applications to TrackO |
* |
business owner who is new to the application | use more verbose commands to complete my tasks | get more used to the syntax of the commands in the application |
* |
tired business owner working at night | view the application’s GUI in dark mode | my eyes don’t get strained |
Appendix C: Use cases
(For all use cases below, the System is the TrackO and the Actor is the user, unless specified otherwise)
Use case: UC01 - Add an order
MSS
- User requests to add an order.
-
System adds the order.
Use case ends.
Extensions
- 1a. User inputs incomplete order data.
-
1a1. System informs user of the incomplete data.
Use case resumes at 1.
-
Use case: UC02 - Delete an order
MSS
- User requests to delete an order.
-
System deletes the order.
Use case ends.
Extensions
-
1a. The order the user wishes to delete does not exist.
-
1a1. System informs the user of the non-existent order.
Use case ends.
-
-
2a. The list has no orders.
-
2a1. System informs the user of the empty order list.
Use case ends.
-
Use case: UC03 - List orders
MSS
- User requests to list all orders.
-
System lists all orders.
Use case ends.
Extensions
- 2a. The list of orders is empty.
-
2a1. System informs the user that the list is empty.
Use case ends.
-
Use case: UC04 - Find orders
MSS
- User requests to find an order.
-
System finds the order and informs the user of its details.
Use case ends.
Extensions
- 1a. The order the user is trying to find does not exist.
-
1a1. System informs the user that the order does not exist.
Use case ends.
-
Use case: UC05 - Sort orders based on the time they are created
- User requests to sort orders based on the time they are created.
-
System sorts the orders.
Use case ends.
Use case: UC06 - Edit an order
- User requests to edit an item.
-
System edits the order.
Use case ends.
Extensions
- 1a. User inputs incomplete order data.
-
1a1. System informs user of the incomplete order data.
Use case resumes at 1.
-
Use case: UC07 - Add an inventory item
MSS
- User requests to add an inventory item.
-
System adds the inventory item.
Use case ends.
Extensions
- 1a. User inputs incomplete details of the item.
-
1a1. System informs user of the incomplete details.
Use case resumes at 1.
-
Use case: UC08 - Delete an inventory item
MSS
- User requests to delete an inventory item.
-
System deletes the inventory item.
Use case ends.
Extensions
- 1a. The item that the user requests to delete does not exist.
-
1a1. System informs user of the non-existent item.
Use case ends.
-
- 2a. The list of inventory items is empty.
-
2a1. System informs user that the list of items is empty.
Use case ends.
-
Use case: UC09 - List all inventory items
MSS
- User requests to list all inventory items.
-
System lists all inventory items.
Use case ends.
Extensions
- 2a. The list of inventory items is empty.
-
2a1. System informs user of the empty list.
Use case ends.
-
Use case: UC10 - Find an inventory item
MSS
- User requests to find an inventory item.
-
System finds the item and informs the user of its details.
Use case ends.
Extensions
- 1a. The inventory item that the user requests to find does not exist.
-
1a1. System informs the user of the non-existent item.
Use case ends.
-
Use case: UC11 - Edit an inventory item
- User requests to edit an inventory item.
-
System edits the inventory item.
Use case ends.
Extensions
- 1a. User inputs incomplete item data.
-
1a1. System informs user of the incomplete item data.
Use case resumes at 1.
-
Appendix D: Non-Functional Requirements
- Should work on any mainstream OS as long as it has Java
11or above installed. - The software should be portable. Moving from one device to another should not create any problems as long as it is on a mainstream OS with Java
11or above installed. - Each command should be executed within 1 second.
- Should be able to hold up to 10000 orders without a noticeable sluggishness in performance for typical usage.
- Should be able to hold up to 100 items without a noticeable sluggishness in performance for typical usage.
- A user with above average typing speed for regular English text (i.e. not code, not system admin commands) should be able to accomplish most of the tasks faster using commands than using the mouse.
Appendix E: Glossary
- Mainstream OS (Operating System): Windows, Linux, Unix, OS-X
- CLI: Command Line Interface, receives commands from user in the form of lines of text
- GUI: Graphical User Interface, a system of interactive user components for computer software
- Inventory: Any item that the business needs to operate
- Order: Any sales promise that needs to be fulfilled
- Command: An instruction for the application to execute
Appendix F: Instructions for manual testing
Given below are instructions to test the app manually.
Launch and shutdown
- Initial launch
- Download the jar file and copy into an empty folder
- Double-click the jar file
Expected: Shows the GUI with a set of sample orders and items. The window automatically expands to occupy the entire screen.
Starting up with missing/corrupted data files
- Data file is corrupted
Expected: The system will start with an empty application. - Data file is missing from the application
Expected: The system will start with sample data.
Adding an inventory item
- Adding an inventory item
- Prerequisites: None
- Test case:
addi i/Chair q/100 d/Wooden Chair sp/50 cp/10 t/Fragile
Expected: Inventory item is added to the inventory list. Details of the added inventory item shown in the status message. - Test case:
addi i/Chair d/Wooden Chair sp/50 cp/10 t/Fragile
Expected: No inventory item is added. Error details shown in the status message. - Other incorrect addi commands to try:
addi,addi x,...(where x is a string containing the inventory item details but is missing a required parameter)
Expected: similar to previous.
Listing all inventory items
- Display all inventory items of a populated inventory
- Prerequisites: Have an inventory containing 1 or more inventory items
- Test case:
listi
Expected: All inventory items are displayed.
- Display all inventory items of an empty inventory
- Prerequisites: Have an inventory containing 0 inventory items
- Test case:
listi
Expected: No inventory items are displayed.
Finding an inventory item
- Finding an inventory item that exists in the inventory list
- Prerequisites: Have an inventory list containing only inventory items with the item names
Chair,Table,Bed. - Test case:
findi Chair
Expected: Only the inventory item with the item nameChairis displayed. Number of inventory items found shown in the status message. - Test case:
findi
Expected: No inventory item is found, no change to current displayed inventory item list. Error details shown in the status message.
- Prerequisites: Have an inventory list containing only inventory items with the item names
- Finding an inventory item that does not exist in the inventory list
- Prerequisites: Have an inventory list containing only inventory items with the item names
Chair,Table,Bed. - Test case:
findi pen
Expected: No inventory item is displayed in the inventory list. 0 inventory items found shown in the status message.
- Prerequisites: Have an inventory list containing only inventory items with the item names
Deleting an inventory item
- Deleting an inventory item while all inventory item(s) are being shown
- Prerequisites: List all inventory items using the
listicommand. Multiple inventory items in the inventory list. First inventory item in the displayed inventory list is not involved in any uncompleted orders. Third inventory item in the displayed inventory list is involved in uncompleted order(s). For example, with the sample data loaded in TrackO, the commandlistiwill list all inventory items, where the first inventory itemChairis not involved in any uncompleted orders, whereas the third itemBolsteris. - Test case:
deletei 1
Expected: First inventory item is deleted from the inventory list. Details of the deleted inventory item shown in the status message. - Test case:
deletei 3
Expected: No inventory item is deleted from the inventory list. Error details shown in the status message (involved in uncompleted orders). - Test case:
deletei 0
Expected: No inventory item is deleted. Error details shown in the status message. - Other incorrect delete commands to try
deletei,deletei x, … (where x is larger than the size of the displayed inventory list)
Expected: Similar to previous.
- Prerequisites: List all inventory items using the
- Deleting an inventory item while only some inventory item(s) are being shown
- Prerequisites: Find inventory item(s) using the
findicommand. First inventory item in the displayed inventory list is not involved in any uncompleted orders. Second inventory item in the displayed inventory list is involved in uncompleted order(s). For example, with the sample data loaded in TrackO, the commandfindi Chair Mattresswill find and display only the items with the nameChairandMattressin the inventory list, where first itemChairis not involved in any uncompleted orders, whereas second itemMattressis involved. - Test case:
deletei 1
Expected: First inventory item is deleted from the displayed inventory list. Details of the deleted inventory item shown in the status message. - Test case:
deletei 2, where n is the index of an inventory item which is involved in uncompleted order(s). For example,deletei 2afterfindi Chair Pillowwith the sample data.
Expected: No inventory item is deleted. Error details shown in the status message. - Test case:
deletei 0
Expected: No inventory item is deleted. Error details shown in the status message. - Other incorrect delete commands to try:
deletei,deletei x, … (where x is larger than the size of the displayed inventory list)
Expected: Similar to previous.
- Prerequisites: Find inventory item(s) using the
Editing an inventory item
- Editing an inventory item while all inventory item(s) are being shown
- Prerequisites: List all inventory items using the
listicommand. Multiple inventory items in the inventory list. First inventory item in the displayed inventory list is not involved in any uncompleted orders. Third inventory item in the displayed inventory list is involved in uncompleted order(s). For example, with the sample data loaded in TrackO, the commandlistiwill list all inventory items, where the first inventory itemChairis not involved in any uncompleted orders, whereas the third itemBolsteris. - Test case:
editi 1 i/Red Chair q/20 sp/10 cp/2
Expected: First inventory item is edited. Name, quantity, sell price and cost price is updated toRed Chair,20,$10.00,$2.00respectively. - Test case:
editi 3 i/Test Item Name
Expected: No inventory item is edited. Error details shown in the status message (involved in uncompleted orders). - Test case:
editi 0
Expected: No inventory item is edited. Error details shown in the status message. - Other incorrect edit commands to try:
editi,editi x, … (where x is larger than the size of the displayed inventory list)
Expected: Similar to previous.
- Prerequisites: List all inventory items using the
- Editing an inventory item while only some inventory item(s) are being shown
- Prerequisites: Find inventory item(s) using the
findicommand. First inventory item in the displayed inventory list is not involved in any uncompleted orders. Second inventory item in the displayed inventory list is involved in uncompleted order(s). For example, with the sample data loaded in TrackO, the commandfindi Chair Mattresswill find and display only the items with the nameChairandMattressin the inventory list, where first itemChairis not involved in any uncompleted orders, whereas second itemMattressis involved. - Test case:
editi 1 i/Red Chair q/20 sp/10 cp/2
Expected: First inventory item is edited. Name, quantity, sell price and cost price is updated toRed Chair,20,$10.00,$2.00respectively. - Test case:
editi 2 i/Test Item Name
Expected: No inventory item is edited. Error details shown in the status message (involved in uncompleted orders). - Test case:
editi 0
Expected: No inventory item is edited. Error details shown in the status message. - Other incorrect edit commands to try:
editi,editi x, … (where x is larger than the sie of the displayed inventory list)
Expected: Similar to previous.
- Prerequisites: Find inventory item(s) using the
Adding an order
- Adding an order, attempt to add existing and non-existent inventory items in order’s item list.
- Prerequisites: Multiple inventory items exist in the inventory list. One of them with the item name
Chair, and none of them with the nameApple - Test Case: Execute the following commands below in sequence and check the response by the system.
- Step 1:
addo n/John Doe p/98765432 e/johnd@example.com a/311, Clementi Ave 2, #02-25
Expected: Add order command initiated. System prompts for further item and quantity input - Step 2:
i/Chair q/10
Expected: System accepts the item and quantity input, prompts for further input. - Step 3:
i/Apple q/20
Expected: System notifies that inventory item with nameAppledoes not exist, prompts for further input. - Step 4:
done
Expected: Order is added to the order list. Order details shown in the status message.
- Step 1:
- Prerequisites: Multiple inventory items exist in the inventory list. One of them with the item name
- Initiating the command, attempt to add an order with an empty item list
- Prerequisites: None
- Test case: Execute the following commands below in sequence and check the response by the system.
- Step 1:
addo n/John Doe p/98765432 e/johnd@example.com a/311, Clementi Ave 2, #02-25
Expected: Add order command initiated. System prompts for further item and quantity input - Step 2:
done
Expected: System notifies that order’s item list cannot be empty and exits the command sequence.
- Step 1:
- Initiating the command, aborting the command.
- Prerequisites: None
- Test case: Execute the following commands below in sequence and check the response by the system.
- Step 1:
addo n/John Doe p/98765432 e/johnd@example.com a/311, Clementi Ave 2, #02-25
Expected: Add order command initiated. System prompts for further item and quantity input. - Step 2:
cancel
Expected: System notifies that the command has been aborted and exits the command sequence.
- Step 1:
Listing all orders
- Listing all orders after calling
findo- Prerequisites: List all orders using the
listocommand. There are already multiple existing orders. Of these orders, there exist 2 orders made by customers withChanin their names. Before testing, enterfindo n/Chan
Expected: Order list displays 2 orders by customers withChanin their name. - Test case: Enter
listointo the command box.
Expected: All orders listed in the order list. - Other incorrect
listocommands to try: EnterlistOinto the command box.
Expected: Result display showsUnknown command.
- Prerequisites: List all orders using the
Finding order(s)
- Finding an order while all orders are being shown
- Prerequisites: List all orders using the
listocommand. Multiple orders in the list. - Test case: Enter
findo -dinto the command box.
Expected: Orders which have been delivered are displayed. The number of orders which correspond to the search parameters is displayed in the result display. - Test case: Enter
findo n/Alex a/Geylanginto the command box.
Expected: Orders which have a customer nameAlexand address containing the wordGeylangwill be displayed. The number of orders which correspond to the search parameters is displayed in the result display. - Test case: Enter
findo Alexinto the command box.
Expected: Result display displays an invalid command format message with the specifications of the correctfindocommand format. - Other incorrect
findocommands to try:findo,findo -e.
Expected: Similar to previous.
- Prerequisites: List all orders using the
Sorting orders by time created
- Sorting orders by time created while all orders are being shown
- Prerequisites: List all orders using the
listocommand. Multiple orders in the order list. - Test case: Enter
sorto oldinto the command box.
Expected: Orders in the order card will be displayed from oldest to newest. - Test case: Enter
sorto newinto the command box.
Expected: Orders in the order card will be displayed from newest to oldest. - Test case: Enter
sorto hellointo the command box.
Expected: Result display displays an invalid command format message with the specifications of the correctsortocommand format.
- Prerequisites: List all orders using the
Deleting an order
- Deleting an order while all orders are being shown
- Prerequisites: List all orders using the
listocommand. Multiple orders in the orders list. - Test case:
deleteo 1
Expected: First order is deleted from the list. Details of the deleted order shown in the status message. - Test case:
deleteo 0
Expected: No order is deleted. Error details shown in the status message. - Other incorrect delete commands to try:
deleteo,deleteo x,...(where x is larger than the list size)
Expected: Similar to previous.
- Prerequisites: List all orders using the
- Deleting an order while only some orders are being shown
- Prerequisites: Find orders using the
findokeyword. For example, with the sample data loaded in TrackO, the commandfindo i/pillowcan be used. A number of orders (less than total orders) in the orders list. - Test case:
deleteo 1
Expected: First order in the current list is deleted from the list. Details of the deleted order shown in the status message. - Test case:
deleteo 0
Expected: No order is deleted. Error details shown in the status message. - Other incorrect delete commands to try:
deleteo,deleteo x,...(where x is larger than the current list size)
Expected: Similar to previous.
- Prerequisites: Find orders using the
Editing an order
- Editing an order while all orders are being shown
- Prerequisites: List all orders using the
listocommand. Multiple orders in the orders list. - Test case with sample data:
edito 4 p/91234567(Note: the order at the index must not be labelled as paid / delivered / completed)
Expected: Phone number of the fourth order in the list is updated to91234567. Updated details of the edited order shown in the status message. - Test case:
edito 0
Expected: No order is edited. Error details shown in the status message. - Other incorrect edit commands to try:
edito,edito x,...(where x is the index of a completed order)
Expected: Similar to previous.
- Prerequisites: List all orders using the
Marking an order
- Marking an order while all orders are being shown
- Prerequisites: List all orders using the
listocommand. Multiple orders in the orders list. - Test case with sample data:
marko 3 -p(Note: the order at the index must not already be paid)
Expected: First order in the list is marked as paid. Details of the marked order shown in the status message. - Test case:
marko 0 -p
Expected: No order is marked. Error details shown in the status message. - Other incorrect mark commands to try:
marko,marko x,...(where x is less than the size of the list)
Expected: Similar to previous.
- Prerequisites: List all orders using the
- Marking an order while only some orders are being shown
- Prerequisites: Find orders using the
findokeyword. For example, with the sample data loaded in TrackO, the commandfindo i/mattresscan be used. A number of orders (less than total orders) in the orders list. - Test case:
marko 1 -d
Expected: First order in the current list is marked as delivered. Details of the marked order shown in the status message. - Test case:
marko 0 -d
Expected: No order is marked. Error details shown in the status message. - Other incorrect mark commands to try:
marko,marko x -p,...(where x is the index of an order already paid)
Expected: Similar to previous.
- Prerequisites: Find orders using the
Getting help
- Opening the help window
- Prerequisites: Help window is not opened, or not in focus.
- Test case:
help
Expected: Help window is opened. - Test case:
help 123,help x,help #$%,...(where there can be any input after the wordhelp, as long as it is followed by a whitespace)
Expected: Help window is opened. - Test case:
help###,Help,helpxx,...(where there are characters not separated by a whitespace afterhelp)
Expected: The help window is not opened and an error message is shown by the system. - Test case:
Help,HELP,...(wherehelpis not in all lower cases)
Expected: The help window is not opened and an error message is shown by the system.
Clearing data in TrackO
- Clearing data in TrackO.
- Test case:
clear, followed byconfirm
Expected: All data in theOrderListandInventoryListis cleared. - Test case:
clear, followed bycancel
Expected: All data in theOrderListandInventoryListshould remain intact. - Test case:
Clear,CLEAR,...(whereclearis not in all lower cases)
Expected: The command does not proceed to the next stage and an error message is shown by the system. - Test case:
clear, followed byx,123,abc,...(any input that is notconfirmorcancel)
Expected: An error message showing the proper ways to proceed or abort the command is shown by the system.
- Test case:
Exiting TrackO
- Exiting via CLI
- Test case:
exit
Expected: Window closes.
- Test case:
Editing the data file
- Data is edited according to the right format
Expected: The system will detect the change, and the edited data will load into the application successfully. - Data is edited following an incorrect format
Expected: The system will start with an empty application.